

The following article, "Hardness Testing of Ceramics" was written by George D. Quinn of the National Institute of Standards and Technology. It originally appeared in the August, 1998, Volume 154, Number 2 edition of "Advanced Materials and Processes" magazine. It is reproduced here with the kind permission of Margaret Hunt, Editor of "Advanced Materials and Processes."
Hardness is one of the most frequently measured properties of a ceramic. Its value helps to characterize resistance to deformation, densification, and fracture.
Hardness is crucial for cutting tools, wear and abrasion-resistant parts, prosthetic hip-joint balls and sockets, optical lens glasses, ballistic armor, molds and dies, valves, and seals. In fact, many ceramic specifications list minimum hardness requirements. For example, a new ASTM zirconia specification for surgical implants, F 1873-98, stipulates that Vickers hardness (HV) shall be no less than 11.8 GPa (1200 kgf/ mm2) at a load of 9.8 N (1 kgf).
Although measuring and interpreting ceramic hardness should be routine, pitfalls, controversies, and surprises abound. This article outlines typical hardness measurement techniques, and describes and explains some of the hazards that await the unwary traveler.
Measurement techniques
Hardness is usually measured on conventional microhardness machines with
Knoop or Vickers diamond indenters. These machines make impressions whose
diagonal size is measured with an attached optical microscope (Fig. 1 and
2).
 |
Fig. 1- These two images show scanning electron microscope photos of a Knoop indentation (19.6N) in a silicon nitride specimen. Lower photo shows a close-up of the left indentation tip. Slight roughness on the edge of the indentation is caused by individual grain dislodgments. |
 |
|
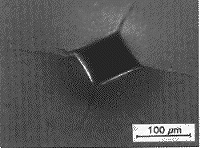
| Fig. 2- This is an optical photo of a Vickers indentation (98N) in silicon nitride. The specimen is tilted to show the three dimensional form of the indentation, including the tip cracking and the side uplift. |  |
For research purposes, Vickers, Knoop, and Berkovich (triangular pyramid) indenters are customary; Rockwell and Brinell indenters are rarely suitable for ceramics research.
For engineering and characterization applications, approximately 60% of worldwide published ceramic hardness values are Vickers, with loads typically in the range of a few newtons to 9.8 N (1 kgf) and occasional data for soft or high-toughness ceramics as high as 98 N (10 kgf). About 35% are Knoop with loads from as low as 0.98 N (100 gf) to 19.6 N (2 kgf). Knoop hardness is more frequently cited in the United States than in the rest of the world, presumably because of ASTM standards C730 for glass and glass ceramics, and C849 for ceramic whitewares. About 5% are Rockwell, usually either the HRA or superficial HR45N scales.
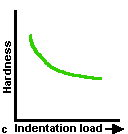
At low indentation loads, problems arise from the load dependence of hardness and from measurement uncertainty due to the small indentation size. At higher loads, cracking and spalling become problems; in some cases, they make credible measurement impossible. The indentation size effect, in which hardness decreases with increasing indentation load, is found with both Knoop and Vickers hardness. A constant hardness is reached at loads from 5 N to 100 N, depending on the ceramic.
The Knoop hardness often is higher at low loads, but then decreases to a plateau load that is somewhat (-10%) less than the Vickers hardness at high loads. Ideally, the entire hardness vs. load curve should be measured, but in practice operators often choose one reference or standard load to allow comparisons between materials. In fact, it is preferable to make the indentations as large as possible to reduce measurement uncertainties, yet not so large as to have the excessive cracking that can interfere with the measurement. (The preferred loads for indentation are listed in the following sections.) Since hardness is strongly dependent on indentation load, the load should always be reported with the hardness outcome.
Many contemporary structural ceramics have hardnesses in the 10 to 30 GPa range. For the higher hardness, Vickers indentations made at 9.8 N (1 kgf) load are 25 microns in size and Knoop indentations are 68 microns long.
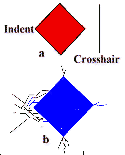
The difficulties in acquiring accurate and precise hardness readings are often not appreciated. Figure 3 shows some of the common, serious issues with hardness measurements in ceramics.
 |
 |
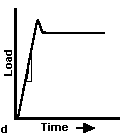 |
| Fig.3-Common problems in ceramic hardness testing include (a) crosshair technique; (b) indentation cracking; (c) indentation size effect; (d) impact or vibrations; (e) optical resolution limits. | ||
 |
||
For example, the slightest bump to a hardness machine or the table it sits on while the indenter is in contact with the specimen can create an appreciable error. Cracking compounds the difficulty in estimating where a tip ends, and all too often makes reading the indentation size hopeless.
Furthermore, because hardness is inversely proportional to the square of the diagonal length of the indentation, any error in length measurement is doubled.
Therefore, it is crucial that the diagonal length be measured carefully, especially for ceramics in which the indentation size is small and the percentage error may be larger. Remember that smaller diagonal lengths are produced in ceramics than in most metals for a given load, which increases measurement uncertainty. In fact, a recent Versailles Advanced Materials and Standards (VAMAS) round-robin project showed that the reproducibility uncertainty in reported mean hardness of two aluminas was 10 to 15%, and in some instances much higher.
Microscopy techniques
Correct optical microscopy technique is crucial for ceramic hardness
measurements. Reasonable skill, experience, and careful experimental technique
are necessary to accurately and precisely measure diagonal lengths. The
instrument itself must also meet minimum standards. The early microhardness
literature has many discussions of objective lens quality and design, optical
resolution limits, crosshair technique, and especially the need for field
and aperture diaphragms to control contrast and brightness. The latter are
especially important for translucent or transparent ceramics and glasses.
In fact, much of the difference in interpretation of indentation tip location
between observers can be traced to illumination and contrast control.
Another aspect of the problem is recognition of the lack of precision in an instrument. Although many machines have digital readouts to 0.1 micron, users should recognize that this is less than the wavelength of light! Therefore, it does not represent the true accuracy or precision, which in fact is probably several times larger. In practice, the resolution of the indentation tips and the subjectivity of the viewer usually lead to a "between-observer" variability of 0.5 microns to 1.0 micron.
Moreover, in spite of the importance of optical techniques, it is amazing that some contemporary commercial hardness machines have no aperture diaphragm, and some have neither an aperture nor a field diaphragm. The author has no idea how optimum indentation illumination on ceramics may be achieved with such inadequate equipment!
Instead, the emphasis with contemporary machines seems to be on capturing the indentation image with a video camera. The image is then projected onto a monitor, and the results are interpreted by a computer.
Unfortunately, computer technology cannot overcome the basic optical limitations of an instrument. In many instances, a single monitor pixel can represent as much as 0.5 microns, a significant fraction of the size of a small ceramic indentation. In view of this dimension, it seems unlikely that the tip resolution of such systems can ever match that which is achievable by the trained eye of an expert microscopist.
Knoop hardness
Frederick Knoop developed his elongated pyramidal indenter as an alternative
to the square-base pyramidal Vickers indenter, in large part to overcome
the cracking observed in brittle materials. Indeed, experience with a wide
range of ceramics has proven that the Knoop indentations are far less likely
to crack. Besides ASTM standard E 384, Microhardness of Materials, three
material-specific Knoop hardness standards have been developed:
The European Community prestandard, CEN ENV 843-3, has both Knoop and Vickers hardness methods as well as Rockwell A and N scales. In addition, a new ISO Ceramic Hardness standard is in preparation in Technical Committee TC 206, Fine Ceramics, and will include both Knoop and Vickers hardness.
Knoop indentations are about 2.8 times longer and are shallower than Vickers indentations made at the same load. In principle, the longer indentations should make an easier-to-read indentation, but in practice the length advantage is offset by the greater difficulty in determining where the tapered tip ends.
A major advantage of the Knoop indentation over Vickers for ceramics is that larger indentation loads may be applied without cracking. With longer indentations, the accuracy and the precision of the length measurements are superior. Even if the sides of the indentation are displaced or cracked, a credible diagonal length reading and hardness estimate may be made.
The tip uncertainty is often of the order of 0.5 mm to 1.0 mm, irrespective of the indentation size; consequently, the percentage error is minimized with long indentations. In addition, it is easier to measure hardness in the constant-hardness region of the indentation size-effect curve. Despite these advantages, Knoop hardness is under-utilized and under-appreciated by the ceramics community.
Optical microscope resolution limits are potentially serious for Knoop indentations due to the slender tapered tip. The error in underestimating the true tip location has been calculated as 7l/(2NA) for Knoop, where l is the wavelength of light and NA is the objective lens numerical aperture. For a typical microscope having a 40X, 0.65 NA objective lens, the calculated correction for green light (l=0.55 microns) is 3 microns, a significant number.
A correction for this is incorporated in the two older ASTM Knoop standards: C 730 for glass and C 849 for ceramic whitewares, but is not included in the master microhardness of materials standard E 384, or in the advanced ceramic standard, C 1326. The confusion about whether to add this correction factor has reached the point where a major glass manufacturer has listed both uncorrected and corrected numbers for Knoop hardness numbers in its product data handbooks.
To help determine whether the full 7l/(2NA) correction is appropriate, NIST compared calibrated scanning electron microscope diagonal length measurements to optical microscope measurements on a single SEM-measured Knoop impression in a silicon nitride reference block. The indentation was measured optically by four skilled operators. Three used the optical system on a conventional microhardness machine, and the fourth used a metallograph that is applied in certifying metallic microhardness SRMs.
The length was measured through several lenses with different numerical apertures, all calibrated by the same NIST-certified stage micrometer. Five or ten repetitions were made by each observer. Tne SEM measurements benefited from higher magnification photographs (1500X, 5000X) to aid in tip location. The mean SEM length measurement was 146.8 microns (+0.2 microns). The mean optical diagonal lengths were 0.4 to 2.1 microns shorter than the SEM readings. These differences are less than the full 7l/(2NA) = 3.0 micron correction, probably because the optical observers discerned the tip as a faint black line, albeit not necessarily as two distinguishable tip lines, as illustrated in Fig. 3.
Later, as part of an eleven-laboratory international round robin, three certification labs obtained average diagonal length readings (10 indentations) that were within 0.4 to 1.2 microns of the NIST SEM readings. This is better than 1% agreement on 142-micron long indentations, and it underscores how the percentage error may be kept small by utilizing large Knoop indentation sizes.
Vickers hardness
The square pyramidal indenter creates smaller, deeper impressions that are more likely to crack than Knoop indentations. ASTM standard E 384, Microhardness of Materials, covers Vickers hardness; C 1327 is a new standard for Vickers hardness of advanced ceramics and recommends a load of 9.8 N (1 kgf). Vickers indentations are rarely made for hardness measurements in glasses, and no ASTM or ISO standards have been written for glass. The optical resolution limits are estimated to be only 1.0l/2(NA) or ~0.4 microns for Vickers indentations. Figure 2 shows a typical well-formed indentation in a silicon nitride specimen. It illustrates the three-dimensional nature of the indentation as well as a modest amount of tip cracking.
Hardness SRM
The poor results from a 1988-1989 VAMAS round robin study with Knoop, Vickers,
and Rockwell tests on alumina ceramics underscored the need for standard
reference materials (SRMs). In 1994, NIST commenced a project for SRM 2830,
Knoop Mardness of Ceramics, which is now available from NIST. It is a HIP'ed
silicon nitride block that was prepared from a ceramic bearing ball. It has
a high-quality polish with five well-defined indentations, and has a nominal
hardness of 13.7 GPa (1400 kgf/ mm2). A typical 19.6 N impression
is shown in Fig. 1.
The average diagonal length (~142.0 microns) for each block is listed and certified to within 0.6 microns (0.4%) at a 95% confidence interval. The 19.6 N load is needed to exploit the advantage that long Knoop indentations provide in reducing the percentage error to such remarkably low levels. Hardness is certified to within 0.9% or within 0.12 GPa (12 kgf/mm2). A calibrated scanning electron microscope was chosen to make all length measurements. A subsequent eleven-laboratory, international round robin verified that operators with conventional optical microscopes produced readings in excellent agreement with the SEM readings. This was especially true for the three participating certification labs: NIST's Metallurgy Division, Wilson Division of Instron, and the Materials Testing Institute, Nord Rhein-Westfalen, Germany.
SRM 2831, Vickers hardness, is still in preparation. It will be a tungsten carbide block and will have five indentations made at a load of 9.8 N (1 kgf). It was difficult to find an opaque ceramic that did not crack at the tips in a fashion that would interfere with the length measurement.
Fracture toughness
Testing operators usually seek to avoid cracking that interferes with the
hardness measurement. However, the ceramic community has contrived a simple
method to estimate fracture toughness (Klc) from the length of
the cracks that do emanate from the corners of a Vickers indentation. The
lengths of the cracks (Fig. 2) and the indentation half-diagonal size are
related to the hardness, elastic modulus, and fracture toughness by an analytical
expression. The early work on this methodology claimed that calculated
Klc's were accurate to within 30 to 40%, a considerable uncertainty.
The mediocre fit success of the early equations prompted the ceramics community
to spawn a plethora of several dozen alternative expressions, to the point
that massive confusion now reigns.
Unfortunately, the method is limited because toughness depends on the measured crack length raised to the 1.5 power. The substantial errors and uncertainties in measuring the crack size (far worse than measuring indentation size) are thus magnified. In fact, another VAMAS round robin demonstrated variability of a factor of almost two in reported toughness. The requirement to develop crack lengths that are sufficiently long (>2.0X the half diagonal size) has led some to apply enormous loads, sometimes up to 500 N! This often causes severe shattering, prompting one skeptical observer to remark that indentations in some materials might resemble "nuclear bomb craters."
Further confusion ensued when the indentation-fracture community confounded the world by sometimes calculating a Vickers hardness based on load over pojected surface area, or H = 2.0 P/d2. This is in contrast to the worldwide convention in which HV is defined as load over contact area, or HV = 1.8544 P/d2, an expression used in every single Vickers hardness standard on this planet.
Lamentably, years of work and tens of thousands of experiments have still not refined the ~30% uncertainty estimate for indentation fracture toughness. Thus, this method is unsatisfactory for accurate results.
Instrumented hardness
Instrumented hardness testing, in which displacement and load are recorded
simultaneously during load application or removal, is an important emerging
technology. Both Vickers and Berkovich (triangular pyramid) indenters are
suitable. Various indices of hardness may be deduced from the load and depth
of penetration of the indenter. An enormous advantage of this methodology
is that it obviates the need for microscopy for measuring the indentation
size, thereby eliminating operator skill or subjectivity, as well as microscopy
limitations.
On the other hand, complications arise on account of the need to make assumptions about the analytical form of the load-displacement curves. Unloading curves may be analyzed to determine the elastic modulus, but again, assumptions about the indenter shape and penetration geometries must be made. No consensus has been formed relating to the interpretation of these curves.
As a result, for example, one commercial apparatus that is widely preferred in Europe for measuring so-called "universal hardness," actually measures a hardness defined as the load divided by assumed contact area while the load is still applied. Consequently, this universal hardness includes both plastic and elastic deformation components.
Sometimes, ordinary microhardness machines may be retrofitted with load and displacement transducers, but care must be taken to measure displacement as close to the indenter-specimen contact point as possible, and machine compliance is an important interference. Severe variability (up to a factor of four) in instrumented hardness results were recently demonstrated in a VAMAS round robin exercise with a borosilicate crown glass and NIST's SRM 2830 silicon nitride blocks. Dedicated low load instrumented hardness or even extremely low-load nanohardness machines are now commercially available. This emerging technology has great promise, but consensus on the analyses, standard procedures, and reference materials is sorely needed.
Size effect and brittleness
Close examination of ceramic Vickers hardness/load curves suggests that a
discrete transition point may be found on either HV versus load or HV versus
diagonal size graphs. At this point, hardness changes from being load-dependent
to a constant value, as illustrated in Fig. 4.
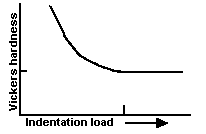 |
Fig. 4- The hardness versus load curve (indentation size effect) has a distinct transition to a plateau hardness. |
The transition point appears to be associated with the onset of extensive cracking around and underneath the indentation. Cracking, an integral response of the ceramic to indentation even at small loads, may either be localized or, at higher loads, massive to the extent that crushing follows. A recent paper analyzes the transition point and relates it to a new index of ceramic brittleness, which is defined as B=HE/(Klc)2. The brittleness index may be important for predicting wear or erosion resistance, or for the characterization of machinability.