The following article was written by George F. Vander Voort and Gabriel Lucas
of Buehler Ltd. It originally appeared in the September, 1998 edition of
Advanced Materials and Processes magazine and is reproduced
here with the kind permission of Margaret Hunt, AM&P Editor.
Microindentation
Hardness Testing
Microindentation hardness testing is a very valuable tool for the materials
engineer, but it must be used with care and full understanding of
potential problems.
The purpose of microindentation hardness testing is to study fine scale changes
in hardness, either intentional or accidental. The technique is also commonly
known as microhardness testing, but this term is misleading because it implies
that the hardness is extremely low, which is not the case. The applied load
and the resulting indent size are small relative to bulk tests, but the same
hardness number is derived. Consequently, ASTM Committee E-4 on Metallography
recommends the term "microindentation hardness testing," which could be given
the acronym MHT.
This article describes the two most common microindentation tests -- the
Vickers and the Knoop tests, which are currently being updated as ASTM Standard
E 384.
The Vickers test
In 1925, Smith and Sandland of the United Kingdom developed a new indentation
test for metals that were too hard to evaluate by the Brinell test, whose
hardened steel ball was limited to steels with hardnesses below ~ 450 HBS
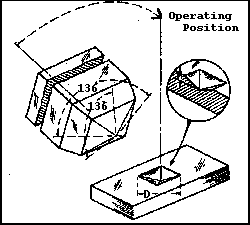
(~ 48 HRC). In designing the new indenter, a square-based diamond pyramid
(Fig. 1), they chose a geometry that would produce hardness numbers nearly
identical to Brinell numbers within the range of both tests. This was a very
wise decision, because it made the Vickers hardness test very easy to adopt. |
 |
| Fig. 1- Schematic diagram showing the shape of the Vickers
indenter and impression. The Vickers hardness number is calculated based
on the surface area of the indent. |
|
The ideal d / D ratio (d = impression diameter, D = ball diameter)
for a spherical indenter is 0.375. If tangents are drawn to the ball at the
impression edges for d / D = 0.375, they meet below the center of
the impression at an angle of 136 degrees, the angle chosen for the Vickers
indenter.
Diamond allows the Vickers test to evaluate any material and, furthermore,
has the very important advantage of placing the hardness of all materials
on one continuous scale. This is a major disadvantage of Rockwell type tests,
for which 15 standard and 15 superficial scales were developed. Not one of
these scales can cover the full hardness range. The HRA scale covers the
broadest hardness range, but this scale is not commonly used.
In the Vickers test, the load is applied smoothly, without impact, and held
in place for 10 or 15 seconds. The physical quality of the indenter and the
accuracy of the applied load (defined in E 384) must be controlled to get
the correct results. After the load is removed, the two impression diagonals
are measured, usually with a filar micrometer, to the nearest 0.1 µm,
and then averaged. The Vickers hardness (HV) is calculated by:
HV = 1854.4L / d2
where the load L is in grams-force and the average diagonal d is in
µm (although the hardness number units are expressed in units of kgf
/ mm2 rather than the equivalent gf / µm2).
The original Vickers testers were developed for test loads of 1 to 120 kgf,
which produce rather large indents. Recognizing the need for lower test loads,
the National Physical Laboratory (U.K.) experimented with lower test loads
in 1932. The first low-load Vickers tester was described by Lips and Sack
in 1936.
Because the shape of the Vickers indentation is geometrically similar at
all test loads, the HV value is constant, within statistical precision, over
a very wide test load range, as long as the test specimen is reasonably
homogeneous.
However, studies of microindentation hardness test results conducted over
the past several years on a wide range of loads have shown that results are
not constant at very low loads. This problem, called the "indentation size
effect," or ISE, has been attributed to fundamental characteristics of the
material. In fact, the same effect is observed at the low load test range
of bulk Vickers testers. Furthermore, an ASTM inter-laboratory "round robin"
of indents made at one laboratory but measured by twelve different people,
reported all three possible ISE responses for the same set of indents!
Since the 1960s, the standard symbol for Vickers hardness per ASTM E 92 and
E 384, has been HV. This nomenclature is preferred to the older, obsolete
symbols DPN or VPN. The hardness is expressed in a standard format. For example,
if a 300 gf load reveals a hardness of 375 HV, the hardness is expressed
as 375 HV300. Note that ASTM recommends a "soft" metric approach
in this case, because rigorous application of the SI system would result
in hardness units expressed not in the standard, understandable kgf /
mm2 values, but in GPa units, which are entirely meaningless to
engineers and technicians.
 |
In the Vickers test, it is assumed that recovery is not elastic
after the load is removed. However, in reality recovery is elastic, and sometimes
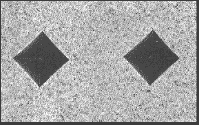
its influence is quite pronounced. Generally, the impression (Fig. 2) appears
to be square, and the two diagonals have similar lengths.
As with the Brinell test, the Vickers hardness number is calculated based
on the surface area of the indent rather than the projected area. However,
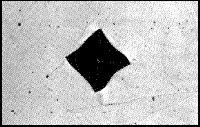
if the impression shape is distorted by elastic recovery, a very common result
in anisotropic materials (Fig. 3), should the hardness be based on the average
of the two diagonals? It is possible to calculate the Vickers hardness based
on the projected area of the impression, which can be measured by image analysis.
Although rigorous studies of this problem are seldom found in the literature,
it appears that the diagonal measurement is the preferred approach even for
distorted indents. |
| Fig. 2 - Example of Properly formed indents with
excellent image contrast (400X) |
 |
| Fig. 3 - Example of a distorted Vickers indent
in an austenitic stainless steel specimen (400X) |
The Knoop test
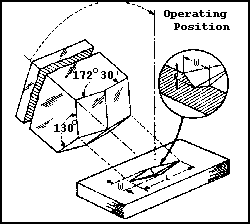
As an alternative to the Vickers test, particularly for very thin layers,
Fredrick Knoop and his associates at the former National Bureau of Standards
(now NIST) developed a low-load test with a rhombohedral-shaped diamond indenter,
Fig. 4. The long diagonal is seven times (7.114 actually) as long as the
short diagonal. With this indenter shape, elastic recovery can be held to
a minimum. Some investigators claim no elastic recovery with the Knoop indent,
but this cannot be true, because measurements of the ratio of
long-to-short diagonal often reveal results substantially different
than the ideal 7.114 value. |
 |
| Fig. 4 - Schematic showing the shape of the Knoop indenter
and impression. |
|
The Knoop test is conducted in the same manner, and with the same tester,
as the Vickers test. However, only the long diagonal is measured, except
for the projected area hardness (PAH) test recommended by Blau. This, of
course, saves some time. The Knoop hardness is calculated from
HK = 14229L / d2
where the load L is in gf and the long diagonal d is in µm. Again,
the symbol HK was adopt in the early 1960s while other terms, such as HKN
or KHN, are obsolete. The Knoop hardnness is expressed in the same manner
as the Vickers hardness: 375 HK300 means that a 300 gf load produced
a Knoop hardness of 375 kgf / mm2.
Aside from a minor savings of time, one chief merit of the Knoop test is
the ability to test thin layers more easily. For surfaces with varying hardness,
such as case hardened parts, Knoop indents can be spaced closer together
than Vickers indents. Thus, a single Knoop traverse can define a hardness
gradient more simply than a series of two or three parallel Vickers traverses
in which each indent is made at different depths. Furthermore, if the hardness
varies strongly with the depth, the Vickers indent is distorted by this change;
that is, the diagonal parallel to the hardness change is affected by the
hardness gradient, while the diagonal perpendicular to the hardness gradient
remains unaffected (both halves of this diagonal are of the same approximate
length).
The shortcoming of the Knoop indent is that the three-dimensional indent
shape changes with test load and, consequently, HK varies with load. In fact,
HK values may be reliably converted to other test scales only for HK values
produced at the standard load, generally 500 gf, that was used to develop
the correlations. However, at high loads the variation is not substantial.
Note that all hardness scale conversions are based on empirical data;
consequently, conversions are not precise but are estimates.
Accuracy, precision, and bias
Many factors (see Table) can influence the quality of microindentation test
results.
| Table: Factors affecting precision and bias in
microindentation hardness testing |
| Instrument Factors |
Measurement Factors |
Material Factors |
Accuracy of the applied load
Inertia effects, speed of loading.
Angle of indentation.
Lateral movement of the indenter or
specimen.
Indentation time.
Indenter shape deviations.
Damage to the indenter.
Insufficient spacing between indents or from edges. |
Calibration of the measurement system.
Resolving power of the objective.
Magnification.
Operator bias in sizing.
Inadequate image quality.
Nonuniform illumination. |
Heterogeneity in composition or microstructure.
Crystallographic texture.
Quality of the specimen preparation.
Low reflectivity or transparency. |
In the early days of low-load (<100 gf) hardness testing, it was quickly
recognized that improper specimen preparation can influence hardness test
results. Most texts state that improper preparation yields higher test results
because the surface contains excessive preparation-induced deformation. While
this is certainly true, improper preparation may also create excessive heat,
which reduces the hardness and strength of many metals and alloys. Either
problem may be encountered due to faulty preparation.
For many years, it was considered necessary to electrolytically polish specimens
so that the preparation-induced damage could be removed, thus permitting
bias-free low-load testing. However, the science behind mechanical specimen
preparation, chiefly due to the work of Len Samuels, has led to development
of excellent mechanical specimen preparation procedures, and electropolishing
is no longer required.
In addition, several operational factors must be controlled for optimum test
results. First, it is good practice to inspect the indenter periodically
for damage; for example, cracking or chipping of the diamond. If you have
metrology equipment, you can measure the face angles and the sharpness of
the tip. Specifications for Vickers and Knoop indenter geometries are
given in E 384.
A prime source of error is the alignment of specimen surface relative to
the indenter. The indenter itself must be properly aligned perpendicular
(±1°) to the stage plate. Next, the surface must be perpendicular
to the indenter. Most testers provide holders that align the polished face
perpendicular to the indenter (parallel to the stage).
If a specimen is simply placed on the stage surface, its back surface must
be parallel to its polished surface. Tilting the surface more than one degree
from perpendicular results in nonsymmetrical impressions, and can produce
lateral movement between specimen and indenter.
However, in most cases, indenting procedures are not the major source of
error. For example, the writer has encountered units that were not applying
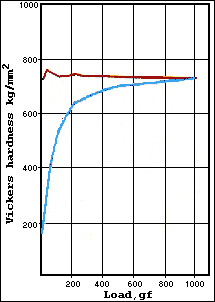
the correct load, as shown in Fig. 5. Tester A produced nearly constant results
over the full load range, while tester B produced the correct results only
at 1000 gf. As the applied load decreased, the hardness decreased to less
than 25% of the correct value! Apparently, the load being applied, for loads
under 1000gf, must have been substantially greater than specified. After
such an evaluation, it is easy to decide which tester to purchase!
As this experience shows, it is important to regularly check the performance
of your tester with a certified test block. The safest choice is a test block
manufactured for microindentation testing and certified for the test (Vickers
or Knoop) as well as the specified load. Strictly speaking, a block certified
for Vickers testing at 300 or 500 gf (commonly chosen loads) should yield
essentially the same hardness with loads from about 50 to 1000 gf.
That is, if you take the average of about five indents and compare the average
at your load to the average at the calibrated load (knowing the standard
deviation of the test results), statistical tests can tell you (at any desired
confidence level) if the difference between the mean values of the tests
at the two loads is statistically significant or not.
| When considering a new tester, it is prudent to perform a series of indents
(five is adequate) at each test load available (as shown in Fig. 5). Then,
plot the mean and 95% confidence limits (not shown in Fig. 5) of each test
as a function of load. Because of the method of defining HV and HK, which
involves dividing by d2, measurement errors become more
critical as d gets smaller; that is, as L decreases and the material's
hardness increases.
Therefore, departure from a constant hardness for the Vickers or Knoop tests
as a function of load becomes a greater problem as the hardness increases.
For the Knoop test, HK increases as L decreases because the indent geometry
changes with indent depth and width. But the change in HK varies with the
test load -- at a higher hardness, the change is greater as L decreases. |
 |
| Fig. 5 - Load vs. Vickers hardness test results for two testers
using a quenched and tempered 440C martensitic stainless steel specimen.
Tester A is red, tester B is blue. |
|
The greatest source of error is measuring the indent, as documented in an
ASTM inter-laboratory test. Place the indent in the center of the measuring
field, because lens image quality is best in the center. The light source
should provide adequate, even illumination to provide maximum contrast and
resolution. The accuracy of the filar micrometer, or other measuring device,
should be verified by a stage micrometer.
Specimen preparation quality becomes more important as the load decreases,
and it must be at an acceptable level. Specimen thickness must be at least
2.5 times the Vickers diagonal length. Because the Knoop indent is shallower
than the Vickers at the same load, somewhat thinner specimens can be tested.
Spacing of indents is important because indenting produces plastic deformation
and a strain field around the indent. If the spacing is too small, the new
indent will be affected by the strain field around the last indent. ASTM
recommends a minimum spacing (center to edge of adjacent indent) of 2.5 times
the Vickers diagonal.
For the Knoop test, in which the long diagonals are parallel, the spacing
is 2.5 times the short diagonal. The minimum recommended spacing between
the edge of the specimen and the center of the indent should be 2.5 times.
Again, Knoop indents can be placed closer to the surface than Vickers indents.
For more information: George F. Vander Voort is director of research
& technology, and Gabriel M. Lucas is a materials engineer at Buehler
Ltd., 41 Waukegan Road, Lake Bluff, IL 60044; tel: 847 / 295-4590; fax: 847
/ 295-7942; e-mail: gfvandervoort@compuserve.com; Web site: www.buehlerltd.com.
Go
To:[Home]
[AM&P Articles]
[Metallography FAQ]
[Vendors]
